
Getting ready for our chat about the stat grid tonight, the main focus of Episode 4. It’s tricky getting clear numbers in a dice system with three variables (dice size [8,10,12], proficiency/training [+0 to +4], stat dice pool [theoretically from 1 to 5, but can go higher]).
What do we know?
The dice system moves like this: Each stat has a variable number of dice, of varying sizes, modified by a skill. A number of dice are thrown, with the character’s proficiency and other modifiers added to it. If any dice are over the target difficulty level, usually 8, the roll is successful.
What’s normal?
-
- 1 die in a stat pool is considered “normal.”
- Difficulty 8 is considered “typical.”
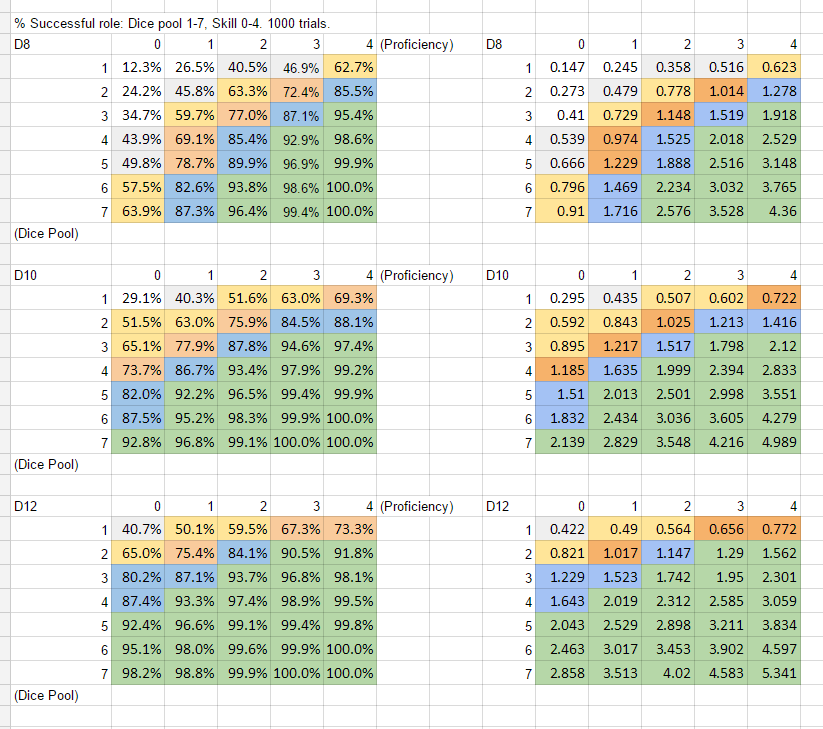
- Players distribute stats based on three types of dice: D8, D10, and D12. Of those, PCs start with two sets of D10s, and one of D8 and D12, so here, I’ll consider D10 “normal.”
- So far as skill training goes, level 0 is embarrassing, level 2 is a high level of expertise, and level 1 appears to be basic “I’d call this a skill” competency. So I’m considering 1 normal, and 2 “this is somewhat important” training.
A “normal” dice roll, then, is 1d10+1, against a difficulty of 8.
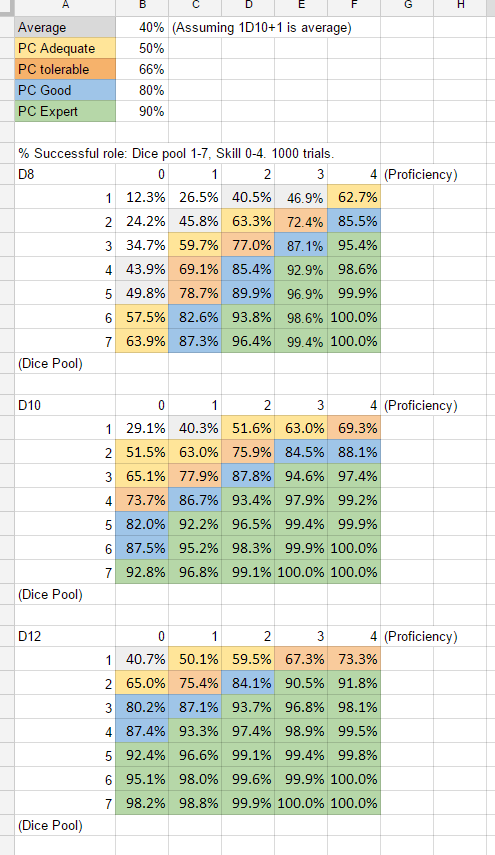
Methodology: All numbers were based on 1,000 trial “rolls” set up using Excel’s =RANDBETWEEN function, either totalled or averaged. A different data set was created for each skill level, so in some cases there may be a 1-2% margin of error (1K of samples is still a small enough set to create some statistical hiccups).
In this chart, I’m working from the base assumption that 1D10+1 is random. At a standard difficulty, 1d10+1 succeeded about 40% of the time. That’s my working “average,” here in gray.
The rest of this chart is personal preference: a 50% failure rate is what I consider minimal adequacy, something I put a few skill points in so that I won’t get caught off guard (say, some essential but not character-centric skill like Ranged Combat.) The same for what I personally consider “good” and “expert.” I like a level of failure!
One thing that’s interesting here is the “jack of all trades” character – without training, someone with a a base stat of 3D10 or 2D12 is overall likely to succeed at any task he can put that stat in. Someone with 2D12 in a few relevant Community stats is unlikely to be caught flat-footed in any normal social circumstance, and whatever column – Community, Body, Economy, Mind – is your D12, you’ll always be at least moderately functional. Again, at a standard difficulty.
This generates a “waterfall curve” showing how D8, D10, and D12 compare on a basic success scale, again assuming standard difficulty. If your character has his Bachelors in a skill, here’s how his dice will likely play out.
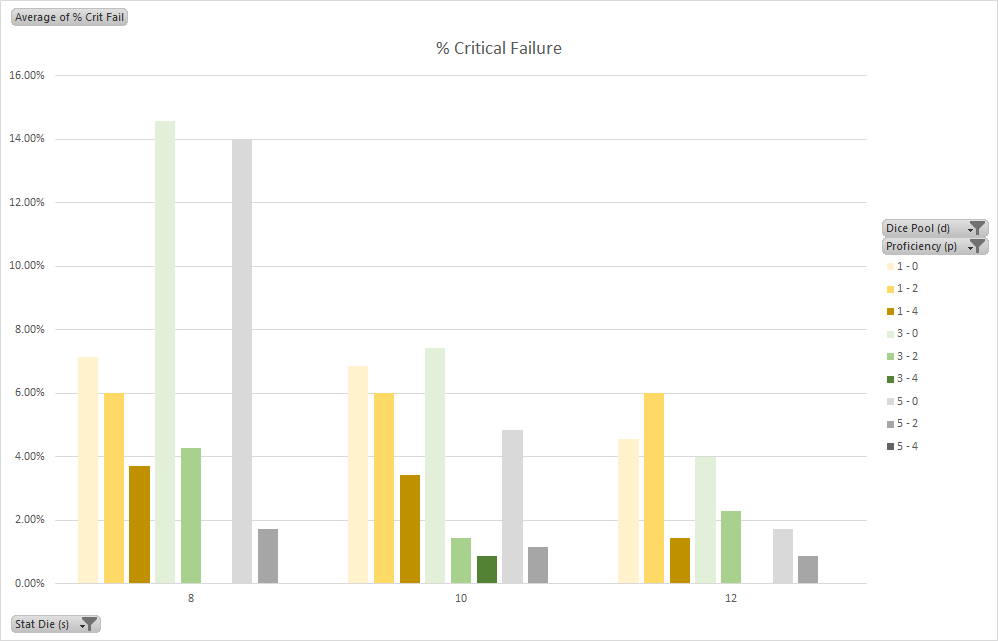
One point of ambiguity on the critical failure mechanic: the rules (main book 170) are ambiguous on how many Critical Failure dice you should roll: “if a player fails a check, and any of the rolls are a natural 1, they have the potential to critically fail. Pick up the die and roll it again. You are now checking to see if things are as bad as they really look…” That could be read as “reroll a single die” or “reroll all the “1”s. The DM screen rephrases, stating that it’s just a single failure die. Yay, clarification.
In this chart I’ve kept the original success chart paralleled with critical failure data. Two facts stick out in this chart, to my mind : firstly, it really is literally impossible to critically fail a standard check with a dice pool of 7. The system says it can’t be done, even with an infinite set of rolls.
Secondly, it’s a tiny bit easier to critically fail if you have 2 dice in your pool than one. I guess the real newbies don’t have enough confidence to truly fail?
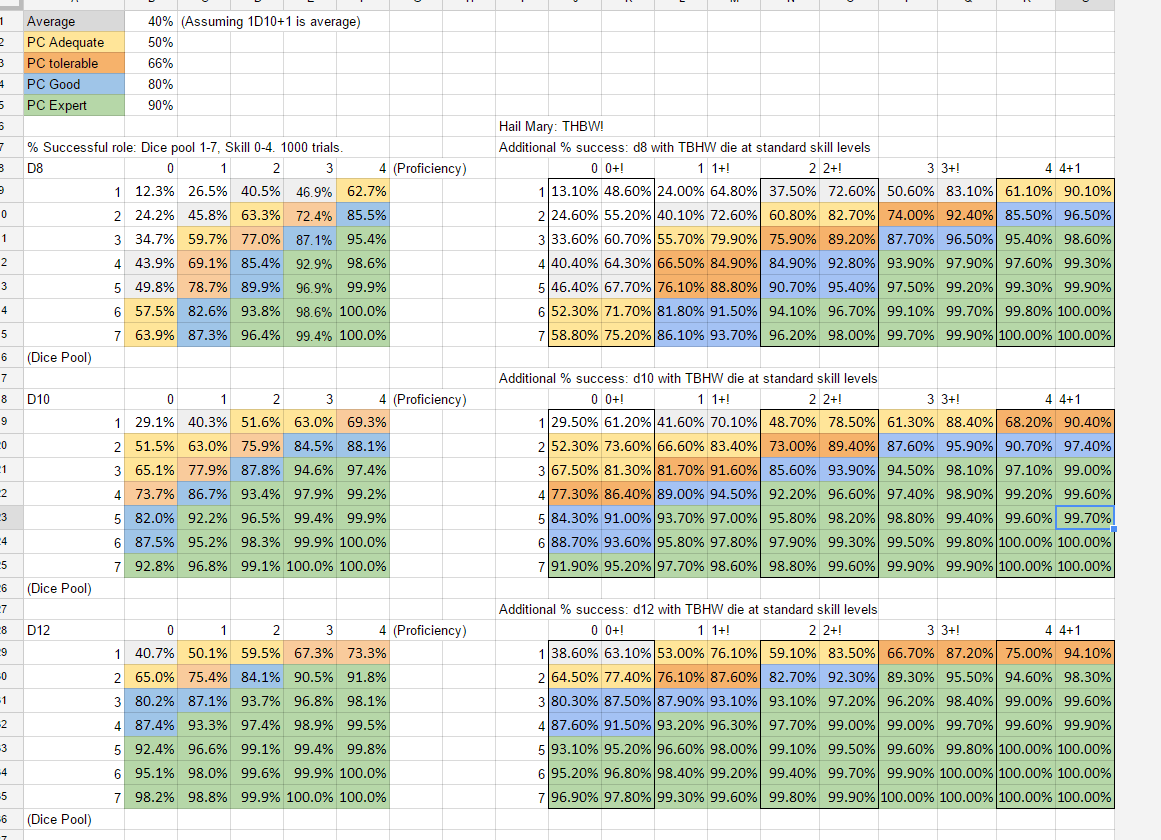
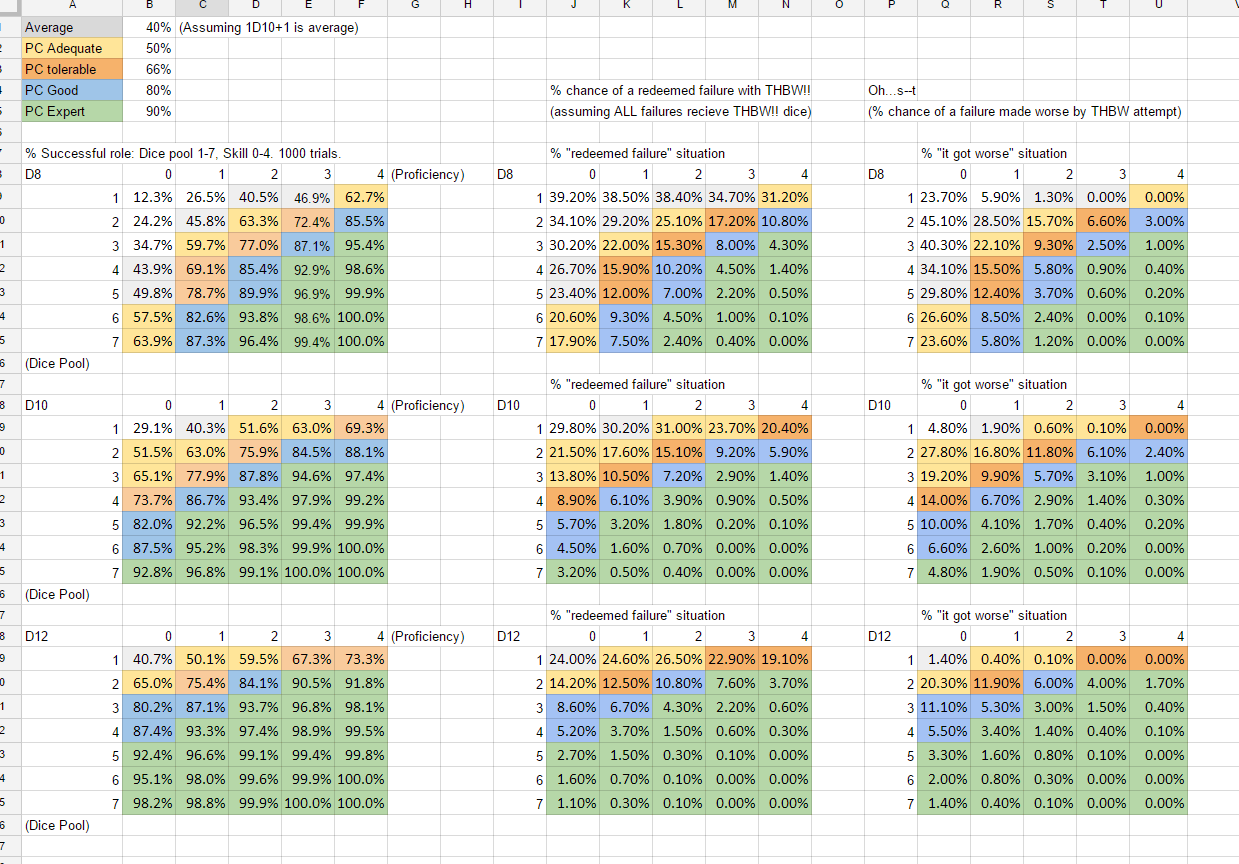
One random variable in the dice system is the “THBW!” mechanic. This stands for “This Had Better Work!” and is covered on page 169. In brief, it’s a push of extra effort to make sure a thing happens. Chaos Muppet players like myself might throw the die in before they make the roll, but since you only have two THBW!! rolls per session, you should really use them on a failed roll, so see if you can salvage it.
In our campaign, the THBW!! die is more frequently called the “Hail Mary” die.
Take an extra 1d12+(modifier) and add it to your roll. If you succeed, good on you. If you fail…instant critical failure. You reached too high and your wings melted.
It’s easy to chart out how the Hail Mary die effects your roll: a 1D12+(modifier) has a 40-73% chance of success, and a corresponding 27%-60% chance of critical failure. Since it’s an optional roll, and usually made on top of an important, failed die roll, it’s hard to meaningfully chart out how a Hail Mary roll plays out at every stat level. But we’ll try.
At the end of the day, any character can reach a level of base proficiency with enough training. Dice pools increase over the course of the game, and your chance of success is drastically increased by raising your skill level…or by asking for help. At any time outside of combat, the help rules (p. 171) show that a dramatic shift in your chance of success is only a phonecall or a back-seat driver away.